Posts Tagged ‘Smartphone’

Configure Your Email Address To Your Email Client at Microsoft Outlook 2010

HostScripter Clients Through MailHostBox.
1. Click on the File tab, select Info, and then click on the Account Settings button and select Account Settings.
Picture

2. Click on New to add your Hover email address.
Outlook 2003: Select POP3 and click Next.
3.) Check the box for “Manually configure server settings or additional server types” & then click Next.
4.) Put the bullet next to “Internet E-mail” then click Next.
5.) Type in Your Name/E-mail Address, Incoming/Outgoing mail servers, User Name/Password
& then click More Settings.** Please note that the Domain Name used for the configuration here is ‘q.com’

For Free Email Service / Email Hosting Plans
***For POP configuration
Account Type: POP
Incoming Mail Server: pop.your-domain-name (eg: pop.yourdomain.org)
Outgoing Mail Server: smtp.your-domain-name (eg: smtp.yourdomain.org)***For IMAP configuration,
Account Type: IMAP
Incoming Mail Server: imap.your-domain-name (eg: imap.yourdomain.org)
Outgoing Mail Server: smtp.your-domain-name (eg: smtp.yourdomain.org)

6.) On the Outgoing Server tab put a check mark next to “My outgoing server (SMTP) requires authentication”
& then put the bullet next to “Use same settings as my incoming mail server”.
7.) On the Advanced tab change the Outgoing server (SMTP) port
to 587, change the encrypted connection to None & then click OK.Tick on Leave a copy of messages on server as per your preference.

***For POP configuration,
Incoming (POP) Server Port Number: 110
Outgoing (SMTP) Server Port Number: 587

***For IMAP configuration,
Incoming (IMAP) Server Port Number: 143
Outgoing (SMTP) Server Port Number: 587

8.) Click on Test Account Settings to test the configuration
Click Next.
9.) Click Finish.
10.) Click Close.
11.) Click Send/Receive to get your mail.
You have successfully configured your Email Address to your Email Client ‘Outlook Express’
You can try sending a Test Email and Test the Accounts Settings.
Source: MailHostBox.com

Configure Your Email Address On Your Android Device

HostScripter Clients through HostMailBox

1. Click on the Applications / Menu button on the Home Screen of your Android Device

Picture

2. Open the ‘Email’ Application.
Picture

3. Select the Account Type as either ‘POP’ or ‘IMAP account’. (Recommended Configuration – IMAP)
Picture

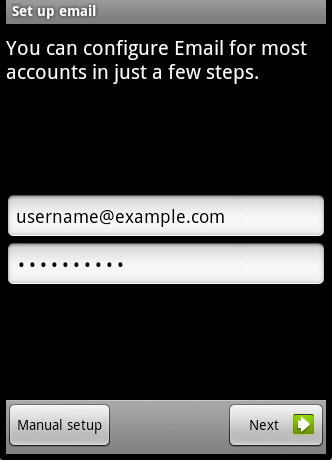
4. Enter your Email address & Password > Click on Next
Picture

5. Enter the information as per the instructions provided on the following screen:
User name: <Complete Email address>
Password: <Email Password>

*** For IMAP Configuration
IMAP Server:
imap.your-domain-name (eg: imap.yourdomain.org)
Port: 143

*** For POP Configuration
POP Server:
pop.your-domain-name (eg: pop.yourdomain.org)
Port: 110

Security Type: None
Click on Next

Picture

6. Enter the information as per the instructions provided on the following screen:

SMTP Server:smtp.your-domain-name (eg: smtp.yourdomain.org)
Port: 587
Security Type: None
Require sign-in: Keep in marked/ticked
Click on Next
User name: <Complete Email address>
Password: <Email Password>.
Click on Next

Picture

7. Select ‘Email check frequency’ ‘Notify me when email arrives’ as per your preference.

Picture

8. Give an account name for the configuration (optional).
Enter Your Name and click on Done.

Picture

9. You have successfully setup an email account on your Android Device.
You may try sending/receiving a test email from the email application.
Picture
Source: HostMailBox.com

iPhone 5’s fever

Courtesy: Doug Gross, CNN


Courtesy: Doug Gross, CNN

(CNN) — Thousands of die-hard fans of Apple’s iconic smartphone endured long overnight lines outside Apple retail stores around the world to be among the first Friday to buy the new iPhone 5.

Near the front of a line of about 200 people Friday morning, Horton said he got about an hour’s worth of sleep while meeting new friends from what he called “the iPhone family.”  Follow story HERE.

Content Protected Using Blog Protector By: PcDrome. & GeekyCube.