Archive of ‘Tutorials’ category

Watch series and movies on your phone for free!

As requested by my former group of students which I considered my family, I just made a quick post on how to use n3tfl1x app for free without using any account!

This is for educational purposes only as you just wanna try it and prove it if it really works and if such really exists. On the other hand, it is illegal.

I still recommend that you download the real app at playstore and subscribe for a premium account, okay! This is the legal way.

WARNING!

  • This is only for YOU and this should not be shared. Remember that, “the more people knew the secret, the faster it could reach the owner”, and they (real developers) will find the fastest way to block your access.
  • Please do not copy and paste the content of this page and paste it anywhere, it is the same as the result of warning no. 1.
  • You should never update this APP or you will lose its magic.
  • USE THIS APP AT YOUR OWN RISK!

=STEPS ON HOW TO GET AND USE THE APP FREE=

  1. Uninstall the real N3TFL1X app you have it already.
  2. Restart your phone to have it 100% successfully uninstalled.
  3. Go to settings of your phone and allow installation from unknown sources.
  4. Click –> this LINK <– and download the app.
  5. Go to your download folder, look for the downloaded apk file and install the app.

Please LIKE my FB pages (HostScripter & ERASolar) and buy me a coffee by clicking DONATE button below! Cheers!

My hobbies!

  • Gusto mo ng solar energy sa bahay para hindi hassle kapag brown-out at para mas makatipid sa bill ng kuryente, contact mo ako. Visit https://erasolarsolutions.net and https://facebook.com/erasolarsolutions. I can guide you or even install it for you.
  • Guys, I am still selling website domain and web hosting for your websites and online systems. I can give you payment reward fees for your referrals. Visit http://hostscripter.com and https://facebook.com/hostscripter .
  • I am doing computer jobs during my vacant time such as website and systems development, remote PC repair, files and data recovery, website recovery and transfer, software analysis and debugging.
  • Hmmmm… FB hack? ehem, that’s another different story. I will try to create a tutorial for that. Respect privacy, that’s what I can advice.

Get 5M or more COC loots while you are sleeping

The presence of software bots are indispensable especially when you are busy with anything. You can be more happy if you see your clash of clans’ storages are full of gold and elixir when you wake up. Then, what are you waiting for? Try this tutorial and enjoy!

clash-of-clans-for-pc

Requirements: 

  • A windows Computer with at least 2gb Memory
  • Download this softwares: BlueStacks  and  GameBot

Steps:

  1. Install the BlueStacks software and restart your computer. *Note: Visit this LINK if you have problem with your display driver.
  2. After installing, connect your computer to the internet.
  3. Open bluestacks, go to SEARCH and install Clash of Clans
  4. Now, extract the CGB4.1.1 file to any location you want in your computer.
  5. Open the extracted folder.
  6. Right click the gamebot.org.exe, and select SEND TO and click Desktop Shortcut.
  7. It’s done.

At last, you have now the software that plays for you in your behalf when you are busy or asleep. Lastly, you need to FOLLOW my last tutorial on how to configure and use this bot click this site viking treausres.

>>>> NEXT TUTORIAL LINK SOON<<<<

Configure Your Email Address To Your Email Client at Microsoft Outlook 2010

HostScripter Clients Through MailHostBox.
1. Click on the File tab, select Info, and then click on the Account Settings button and select Account Settings.
Picture

2. Click on New to add your Hover email address.
Outlook 2003: Select POP3 and click Next.
3.) Check the box for “Manually configure server settings or additional server types” & then click Next.
4.) Put the bullet next to “Internet E-mail” then click Next.
5.) Type in Your Name/E-mail Address, Incoming/Outgoing mail servers, User Name/Password
& then click More Settings.** Please note that the Domain Name used for the configuration here is ‘q.com’

For Free Email Service / Email Hosting Plans
***For POP configuration
Account Type: POP
Incoming Mail Server: pop.your-domain-name (eg: pop.yourdomain.org)
Outgoing Mail Server: smtp.your-domain-name (eg: smtp.yourdomain.org)***For IMAP configuration,
Account Type: IMAP
Incoming Mail Server: imap.your-domain-name (eg: imap.yourdomain.org)
Outgoing Mail Server: smtp.your-domain-name (eg: smtp.yourdomain.org)

6.) On the Outgoing Server tab put a check mark next to “My outgoing server (SMTP) requires authentication”
& then put the bullet next to “Use same settings as my incoming mail server”.
7.) On the Advanced tab change the Outgoing server (SMTP) port
to 587, change the encrypted connection to None & then click OK.Tick on Leave a copy of messages on server as per your preference.

***For POP configuration,
Incoming (POP) Server Port Number: 110
Outgoing (SMTP) Server Port Number: 587

***For IMAP configuration,
Incoming (IMAP) Server Port Number: 143
Outgoing (SMTP) Server Port Number: 587

8.) Click on Test Account Settings to test the configuration
Click Next.
9.) Click Finish.
10.) Click Close.
11.) Click Send/Receive to get your mail.
You have successfully configured your Email Address to your Email Client ‘Outlook Express’
You can try sending a Test Email and Test the Accounts Settings.
Source: MailHostBox.com

Configure Your Email Address On Your Android Device

HostScripter Clients through HostMailBox

1. Click on the Applications / Menu button on the Home Screen of your Android Device

Picture

2. Open the ‘Email’ Application.
Picture

3. Select the Account Type as either ‘POP’ or ‘IMAP account’. (Recommended Configuration – IMAP)
Picture

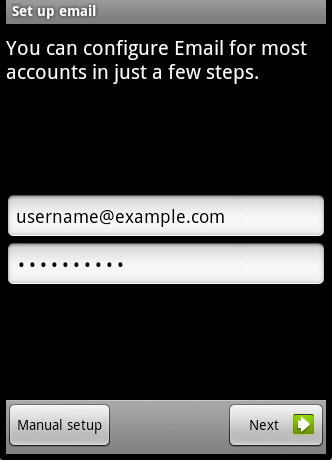
4. Enter your Email address & Password > Click on Next
Picture

5. Enter the information as per the instructions provided on the following screen:
User name: <Complete Email address>
Password: <Email Password>

*** For IMAP Configuration
IMAP Server:
imap.your-domain-name (eg: imap.yourdomain.org)
Port: 143

*** For POP Configuration
POP Server:
pop.your-domain-name (eg: pop.yourdomain.org)
Port: 110

Security Type: None
Click on Next

Picture

6. Enter the information as per the instructions provided on the following screen:

SMTP Server:smtp.your-domain-name (eg: smtp.yourdomain.org)
Port: 587
Security Type: None
Require sign-in: Keep in marked/ticked
Click on Next
User name: <Complete Email address>
Password: <Email Password>.
Click on Next

Picture

7. Select ‘Email check frequency’ ‘Notify me when email arrives’ as per your preference.

Picture

8. Give an account name for the configuration (optional).
Enter Your Name and click on Done.

Picture

9. You have successfully setup an email account on your Android Device.
You may try sending/receiving a test email from the email application.
Picture
Source: HostMailBox.com

Configure Your Email On IPhone

HostScripter Clients through MailHostBox

1. Tap Settings on your home screen.

Picture

2. Scroll down and tap Mail, Contacts, Calendars.

Picture

3. Tap the Add Account option.
Picture

4. Tap Other.
Picture

5. Tap Add Mail Account.
Picture

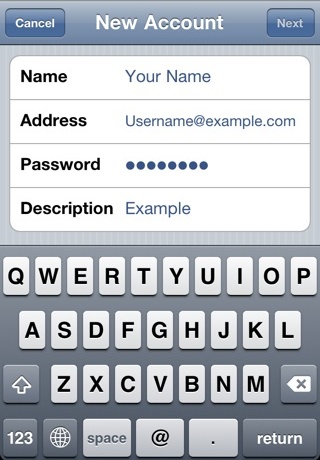
6. Enter the following settings:
Name: Enter your name as you wish it to appear when you send email.
Address: Enter your complete email address.
Password: Enter your email password.
Description: This will be used to identify this email account on your iPhone.

Tap Next.

Picture

7. The email service supports both IMAP and POP. In this tutorial I am going to select IMAP. You can select either IMAP or POP. The settings that follow are the same for both.

We recommend IMAP because it will keep messages in sync between your iPhone and any other computers or devices that you also use with IMAP to access your email account.

Picture

8. Scroll down after selecting IMAP or POP.*** For IMAP Configuration (Recommended Configuration)
Under the Incoming IMAP Mail Server section, enter the following settings.

Host Name:
imap.your-domain-name (eg: imap.yourdomain.org)
User Name: Enter your complete email address.
Password: Enter your email password.

*** For POP Configuration
Under the Incoming POP Mail Server section, enter the following settings.

Host Name:
pop.your-domain-name (eg: pop.yourdomain.org)
User Name: Enter your complete email address.
Password: Enter your email password.

Picture

9. Scroll down to the Outgoing Mail Server section.Under the Outgoing Mail Server section, enter the following settings:

Host Name:
smtp.your-domain-name (eg: smtp.yourdomain.org)
User Name: Enter your complete email address.
Password: Enter your email password.

Picture

10. Tap NextYour device will now verify your email account settings. Be patient, as this may take several minutes.

Picture

11. Tap Save.
Picture

12. The email account configuration has been completed. Your email address will now be listed and you can start using the same.
Picture

Source: MailHostBox.com

1 2 3 13

Content Protected Using Blog Protector By: PcDrome. & GeekyCube.