Archive of ‘Tutorials’ category

Updated COC: Get 1M gems, and build TownHall Lvl-11

Note: Before doing this, please make sure that your current COC account is connected to your gmail account. Root first your phone before using this hack. Create a new gmail account for this experiment.

What you can do with this COC hack? 

  1. You can have unlimited GEMS
  2. Full storage of GOLD and ELIXIR
  3. Build, create, and upgrade to MAX levels
  4. Attack other members with your own strategy

How? 

  1. After rooting your phone, visit google play and install HOST editor app.
  2. Add this to your host editor: IP Address= 5.196.206.239, Hostname = gamea.clashofclans.com
  3. After doing above, runn your coc app.

How to Root your Phone?

In some cases, there were instances that you need some functionalities of your smartphone to do a task which it cannot because it is not rooted.

In my experience, the FRAMAROOT app is the easiest and fastest way to root our smartphones. Why do we need to root our phone? For me, because I can:

  • save space in my internal memory by forcing apps to move to my external memory card
  • backup my apps/sms/phonebook
  • go inside my phone’s root files
  • reprogram my phone’s software
  • change the my phone’s firmware or operating system
  • secure more my phone
  • install more apps that require root requirements
  • and more (too many to mention)

Now, there are things you should take note before rooting your phone.

  1. Check your smartphone model if it’s in the list [HERE]. Take note of the exploit where your phone is listed (ex: boromir).
  2. After doing number 1, download [FRAMAROOT apk here.]

How?

  1. If you used a computer to download the apk, transfer it to your phone and install it.
  2. Run the framaroot app.
  3. Select superSu or superUser.
  4. Choose the appropriate exploit as you have noted above.
  5. Reboot your device.
  6. Enjoy!

Note: Make sure that your battery is not below half of your battery meter. Clean your cache first before doing this tutorial for faster result.


Try at your own risk. The author has no liability to any lose of files or damage to your devices that may occur by following the steps provided here. This is for learning purposes only.

WordPress: How to add star rating?

[sociallocker id=”1096″] [/sociallocker]
I. Install the plugin
1. Download https://erickabuzo.com/wp-content/uploads/2015/01/gdstar.zip
2. Login at your domain.cu.cc/blog/wp-admin
3. In your wordpress dashboard, go to plugins and click add new
4. Click upload, and select the gdstar.zip from your computer
5. Click activate plugin.

II. How to display BLOG rating at the sidebar
1. After installing and activating the plugin, all of your articles has a star rating at the bottom.
2. Visit your articles, rate it and try yourself.
3. Now, go to Appearance menu, and select widgets.
4. At the available widgets (left side), click and drag “GD Blog Rating” to the right to the top of the widget area
5. Input “Blog Rating” at the title box and click save.

6. Visit your domain.cu.cc/blog and see the output.
7. If you can’t see the rating, you must rate at least one of your article.
8. Share your blogsite to your friends and ask them to rate it.

Resource overusage causes

Your shared hosting account can only use a limited amount of system resources. If you are overusing resources on your hosting account, you should review your hosted sites to see if they match any of these common causes.

Cause Description
Storing large files or file collections Improperly using your hosting account’s storage space
Sites that promote spamming Letting anonymous users to spam elements of your website
Unrestricted or anonymous user creation Letting anonymous users to create site content
Web scraping, indexing, and scanning applications Hosting applications that scan massive amounts of external site data
Auto-blogging, article spinning, and SEO-inflation Automating external content creation for invalid SEO purposes
Mass merchant affiliates and cloned websites Cloning multiple external websites for invalid SEO purposes
Mass-emailing platforms Sending massive email campaigns through your web hosting
Outdated applications and add-ons Hosting applications or plugins that are outdated and pose security risks
Other common causes Hosting poorly scripted applications, hosting compromised sites, etc.

We are not able to support custom scripting or third-party applications. You can review these guides for general information, but ultimately you will be responsible for diagnosing, troubleshooting, and correcting any issues that can exist in your sites or applications.

Additional resource usage causes (resource overusage)

Besides the common causes for resource usage, there are some additional possibilities that can contribute to overusing hosting resources.

Is this an issue for me?

Here are some common additional symptoms and causes of resource overusage:

  • Poor scripting and/or site optimization
  • Poor code quality in third-party applications, add-ons, and plugins
  • Websites or applications that have been compromised
  • Cron tasks or other automation that runs resource-intensive commands

How can I correct this issue?

You can try to correct excessive resource usage by following any and all of these steps:

  • Review code and error logs for possible loops, errors, or other bugs.
  • Keep all web applications, add-ons, and plugins up to date at all times.
  • Ensure that you are following good site optimization practices.
  • Review any cron tasks that can use additional resources.
  • Review all hosted content for possible compromise.
  • Implement additional security measures on your site, such as SiteLock.
  • Leave shared hosting and migrate to a VPS or dedicated server.

Next Steps

If you are still experiencing issues with resource usage, review your hosting for other possible causes at Common causes for resource overusage (Linux).

You will want to make sure that you are correcting the underlying cause to any resource issue. Simply removing sites and/or files without correcting the underlying issue can cause the problem to recur.

Source: Godady

How to setup email in Android devices?

Source: JustHost.com

This article will show you how to setup email on a device running the Android OS.

Create a new email account


  1. Enter your full “Email Address”
  2. Enter the password for your “Email Address”
  3. Tap “Next”
  4. Choose the type of email account you will be using.
    • POP3: POP3 will download the emails from the server and store them on your phone.
    • IMAP: IMAP will store the emails on the server and show a cached copy on your phone.
    • Exchange: Exchange is not supported as it requires a Microsoft Exchange server

Incoming Server Settings


  • Username: Please enter your full email address
  • Password: The password for your email address.
  • IMAP server: This is typically your domain name preceded by “mail.”. This can be found in the E-mail Accounts section of the cPanel, under “More” > “Configure Mail Client” .
  • Port:
      • Non Secure (No SSL): 143
      • Secure (SSL): 993
      • Note: Using

    “SSL (Accept all certificates)

       will be more compatible.
  • IMAP path prefix: Please enter INBOX. This will allow for you to store your Sent, Drafts and Deleted emails on the server.
  • Tap Next.

Outgoing Server Settings


  • SMTP server: This is typically your domain name preceded by “mail.”. This can be found in the E-mail Accounts section of the cPanel, under “More” > “Configure Mail Client” .
  • Port:
      • Non Secure (No SSL): 25 or 26
      • Secure (SSL): 465
      • Note: Using

    “SSL (Accept all certificates)

       will be more compatible.
  • Require sign-in Check this as you will need to authenticate with the SMTP server.
  • Username: Please enter your full email address
  • Password: The password for your email address.
  • Tap Next.

Account Options


  • Email Checking Frequency: Set how often you would like your device to check for new emails.
  • Note: The more often you check your email the more drain it will cause on your battery.

  • Send email from thise account by default Check this option if this will be your default email address
  • Notify me when email arrives: Leave this checked if you would like to be notified of new email messages.
  • Tap Next.

Name the account


  • If you would like you can name the email account, this can be helpful if you have multiple accounts on the one device.
  • Enter the name you would like to be shown on all outgoing emails that you send from the device.
  • Tap Done.

Email Setup in any client

Source: JustHost.com

Below are the settings that are needed to configure and retrieve email from your main IMAP or pop account. You may find exact settings in the Email Accounts tool.

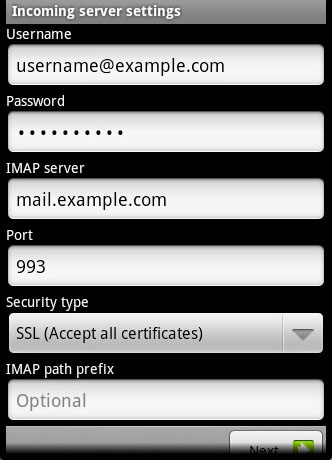
Incoming Mail Server

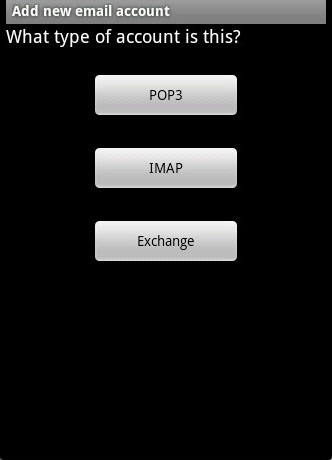
Mail Server Type: IMAP

IMAP is an E-mail protocol that is used when people wish to always have their messages, including sent messages and message folders, saved on the server. Depending on program configuration, these messages may be temporarily saved on the computer for offline viewing. All messages and folders can be viewed from any computer connecting via IMAP, including Webmail. This option is most recommended for users who connect to E-mail accounts from many computers.

  • IMAP Server: mail.yourdomain.com
    Note: You may need to use the server/host name if using SSL. (e.g. just#.Justhost.com)
  • IMAP Username: (your full email address)
  • IMAP Password: (the password that you selected when your account was setup)
  • IMAP Port 143 (With SSL: 993)

Mail Server Type: POP3

POP3 is an E-mail protocol that is used when people wish to have a copy of their E-mail messages, along with any attachments, to be downloaded to their computer for viewing. Depending on program configuration, these messages may be automatically deleted from the server once it is received, or at some future time. Messages sent, moved, or deleted from a computer using POP can only be viewed on that individual computer’s folders. They cannot be viewed on other computers connecting to that E-mail account, including Webmail. This option is most recommended for users who like to keep a backup of all their messages.

  • POP Server: mail.yourdomain.com
  • POP Username: (your full email address)
  • POP Password: (the password that you selected when your account was setup)
  • POP Port 110 (With SSL: 995)

Outgoing Mail Server

Here are the settings that you’ll need to send email:

  • SMTP Server: mail.yourdomain.com
    Note: You may need to use the server/host name if using SSL. (e.g. just#.Justhost.com)
  • SMTP Username: (your full email address)
  • SMTP Password: (the password that you selected when your account was setup)
  • SMTP Authentication: Enabled (Use same login as the incoming mail)
  • SMTP Port 26 (With SSL: 465)

1 2 3 4 13

Content Protected Using Blog Protector By: PcDrome. & GeekyCube.